Vue Playground 演练场源码解读(四)- 终篇
在上篇中咱们注重讲了代码编辑器的相关应用:
codemirror代码编辑器的基础用法,以及Vue Playground源码中具体实践monaco-editor代码编辑器的基础用法,以及Vue Playground源码中的具体实践。
咱们接着对Vue Playground源码进行拆分学习。
在《Vue Playground 演练场源码解读(二)》中咱们了解到了?raw以及importmap的应用。本篇中也会有相关应用实践在这里就不在多说用法以及作用了
iframe 的交互应用
同源交互方法:
- 协议、域名和端口号相同:例如,主页面和
iframe页面的URL都是https://example.com。 - 可以直接访问 DOM:可以使用
iframe.contentWindow或iframe.contentDocument来访问iframe内部的内容,反之亦然。
主页面访问 iframe 内容
const iframe = document.getElementById("myIframe");
const iframeWindow = iframe.contentWindow; // 获取 iframe 的窗口对象
const iframeDocument = iframe.contentDocument || iframeWindow.document; // 获取 iframe 的文档对象

// 操作 iframe 内部的 DOM
iframeDocument.getElementById("someElement").innerText =
  "Hello from main page!";
iframe 访问主页面内容
// 在 iframe 页面中
const parentWindow = window.parent; // 获取主页面的窗口对象
const parentDocument = parentWindow.document; // 获取主页面的文档对象

// 操作主页面的 DOM
parentDocument.getElementById("someElement").innerText = "Hello from iframe!";
特点:
安全风险:由于可以直接访问 DOM,如果 iframe 内容来自不可信的第三方,可能会导致安全问题,如 XSS 攻击。
适用场景:主要用于内部系统或完全可控的页面之间的交互。
不同源交互方法(Vue Playground选择用的就是这种):
如果主页面和 iframe 页面不属于同源(即协议、域名或端口号不同),则无法直接访问彼此的 DOM,需要使用 postMessage API 来实现安全的跨域通信。
主页面向 iframe 发送消息
const iframe = document.getElementById("myIframe");
const message = { type: "fromMainPage", content: "Hello from the main page!" };
const targetOrigin = "https://iframe-domain.com"; // 目标页面的源
iframe.contentWindow.postMessage(message, targetOrigin);
iframe 向主页面发送消息
const message = { type: "fromIframe", content: "Hello from the iframe!" };
const targetOrigin = "https://example.com"; // 主页面的源
window.parent.postMessage(message, targetOrigin);
监听消息
// 在主页面或 iframe 页面中
window.addEventListener(
  "message",
  function (event) {
    // 验证消息来源
    if (event.origin !== "https://expected-origin.com") {
      return; // 忽略非预期来源的消息
    }
    console.log("Received message:", event.data);
  },
  false,
);
特点:
安全性:postMessage 提供了更安全的通信方式,但需要严格验证 event.origin,以防止恶意消息注入。
性能:消息传递的性能通常较好,但需要合理控制消息的大小和频率。
iframe 的属性了解
srcdoc属性
可能对于iframe使用不是那么熟悉的同学,不太了解这个srcdoc属性(也包括我)。在Vue layground的iframe应用中就使用了该属性。
iframe 的 srcdoc 属性是一个非常有用的特性,它允许你在 iframe 中直接嵌入HTML内容,而无需通过外部文件的URL来加载内容。这种方式非常适合在页面中快速嵌入简单的HTML片段,同时避免了跨域问题和额外的HTTP请求。应用如下:
<iframe
  srcdoc="<h1>Hello, World!</h1><p>This is an inline iframe.</p>"
></iframe>
在这个例子中,iframe 会直接渲染 <h1>Hello, World!</h1><p>This is an inline iframe.</p>,而不需要从外部URL加载内容。
srcdoc 也可以进行同源交互
sandbox属性
<iframe> 的 sandbox 属性用于限制嵌入内容的行为,以增强安全性。通过指定不同的关键字,可以解除特定的限制。以下是在Vue Playground中的一些应用:
allow-forms: 允许iframe内部的表单提交。如果没有使用该关键字,表单将无法校验输入内容、发送数据到Web服务器或关闭对话框allow-modals: 允许 iframe 内部通过 Window.alert()、Window.confirm()、Window.print() 和 Window.prompt() 打开模态窗口。此外,它还允许页面接收 BeforeUnloadEvent 事件allow-pointer-lock: 允许 iframe 内部使用指针锁定 API,用于需要鼠标指针锁定的场景,如游戏。allow-popups: 允许 iframe 内部打开新窗口或标签页(例如通过 Window.open() 或 target="_blank")。如果没有使用该关键字,这些操作将静默失败。allow-same-origin: 如果没有使用该关键字,iframe 中的文档将被视为来自一个特殊的源,始终使同源策略失败。这可以防止嵌入内容访问父页面的数据存储或执行某些 JavaScript API 操作allow-scripts: 允许 iframe 内部运行脚本(但不能创建弹窗)。如果没有使用该关键字,脚本执行将被禁止allow-top-navigation-by-user-activation: 允许 iframe 内部的内容导航到顶级浏览上下文(例如改变主页面的 URL),但这种导航只能由用户手势(如点击)启动
大家当作了解吧,这些都是源码中应用到的,博主在这里简单说明下具体作用
Vue Playground预览功能的实现
前面说了那么多就是利用iframe的srcdoc属性实现的,这里主要说一下
先看下srcdoc.html,重点关注下我红框圈住的内容
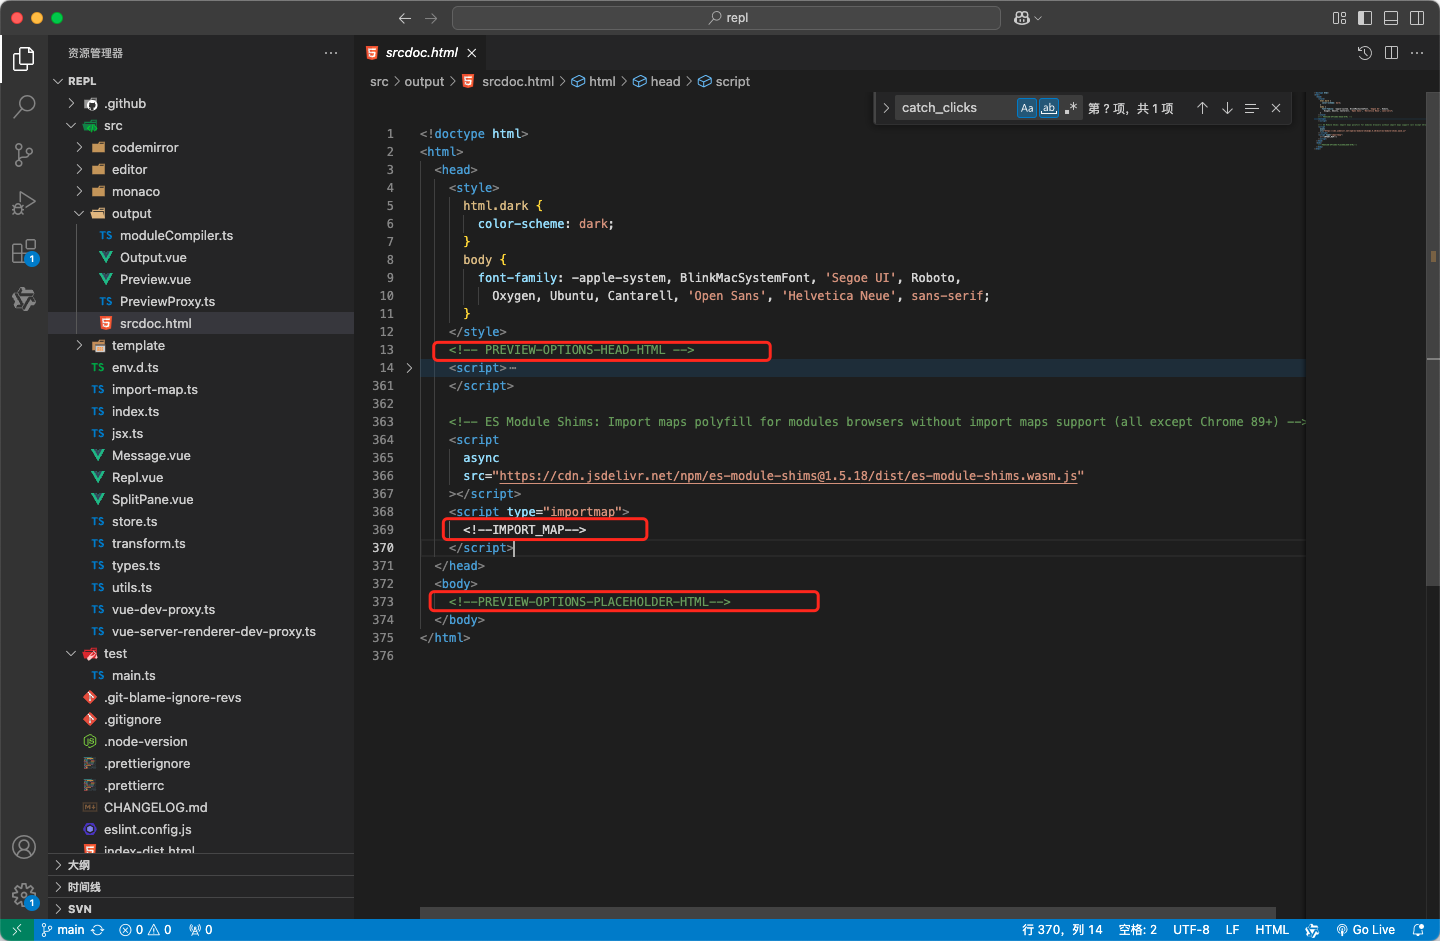
之后看下这段代码:
// ?raw 获取到html文件内容
import srcdoc from "./srcdoc.html?raw";

sandbox = document.createElement("iframe");
sandbox.setAttribute(
  // 设置 `沙盒化` 的属性
  "sandbox",
  [
    "allow-forms",
    "allow-modals",
    "allow-pointer-lock",
    "allow-popups",
    "allow-same-origin",
    "allow-scripts",
    "allow-top-navigation-by-user-activation",
  ].join(" "),
);

const importMap = store.value.getImportMap(); // 获取到importMap值(vue相关版本)
const sandboxSrc = srcdoc
  .replace(
    /<html>/,
    `<html class="${previewTheme.value ? theme.value : ""}">`, // 这里是为了适配主题
  )
  .replace(/<!--IMPORT_MAP-->/, JSON.stringify(importMap)) // 替换 importMap
  .replace(
    /<!-- PREVIEW-OPTIONS-HEAD-HTML -->/, // 这里在 Vue Playground中没有应用,应该是暴漏的替换入口(可以内置一些 <style>、<script>等等)
    previewOptions.value?.headHTML || "",
  )
  .replace(
    /<!--PREVIEW-OPTIONS-PLACEHOLDER-HTML-->/, // 这里在 Vue Playground中没有应用,应该是暴漏的替换入口(可以内置一些iframe的body DOM)
    previewOptions.value?.placeholderHTML || "",
  );
sandbox.srcdoc = sandboxSrc;
containerRef.value?.appendChild(sandbox); // 把iframe 添加到dom中上面就是创建iframe的相关代码。其实可以看到srcdoc.html东西不是很多,那么怎么做到渲染代码编辑器的代码呢?请接着往下看!
再看下srcdoc.html这段代码
async function handle_message(ev) {
  let { action, cmd_id } = ev.data;
  const send_message = (payload) =>
    parent.postMessage({ ...payload }, ev.origin);
  const send_reply = (payload) => send_message({ ...payload, cmd_id });
  const send_ok = () => send_reply({ action: "cmd_ok" });
  const send_error = (message, stack) =>
    send_reply({ action: "cmd_error", message, stack });

  if (action === "eval") {
    try {
      if (scriptEls.length) {
        scriptEls.forEach((el) => {
          document.head.removeChild(el);
        });
        scriptEls.length = 0;
      }

      let { script: scripts } = ev.data.args;
      if (typeof scripts === "string") scripts = [scripts];

      for (const script of scripts) {
        const scriptEl = document.createElement("script");
        scriptEl.setAttribute("type", "module");
        // send ok in the module script to ensure sequential evaluation
        // of multiple proxy.eval() calls
        const done = new Promise((resolve) => {
          window.__next__ = resolve;
        });
        scriptEl.innerHTML = script + `\nwindow.__next__()`;
        document.head.appendChild(scriptEl);
        scriptEl.onerror = (err) => send_error(err.message, err.stack);
        scriptEls.push(scriptEl);
        await done;
      }
      send_ok();
    } catch (e) {
      send_error(e.message, e.stack);
    }
  }

  if (action === "catch_clicks") {
  }
}

window.addEventListener("message", handle_message, false);
if (action === 'eval')这块代码内容主要就是根据传输进来的数据创建script标签,并渲染对应的js。比如:
const scriptEl = document.createElement("script");
scriptEl.setAttribute("type", "module");
scriptEl.innerHTML = `
const h1 = document.createElement('h1')
h1.innerText = 'CSC'
document.body.appendChild(h1)
`;
document.head.appendChild(scriptEl);这一段代码就是创建了一个<script>标签,内容呢就是创建一个<h1>CSC</h1>插入到了body。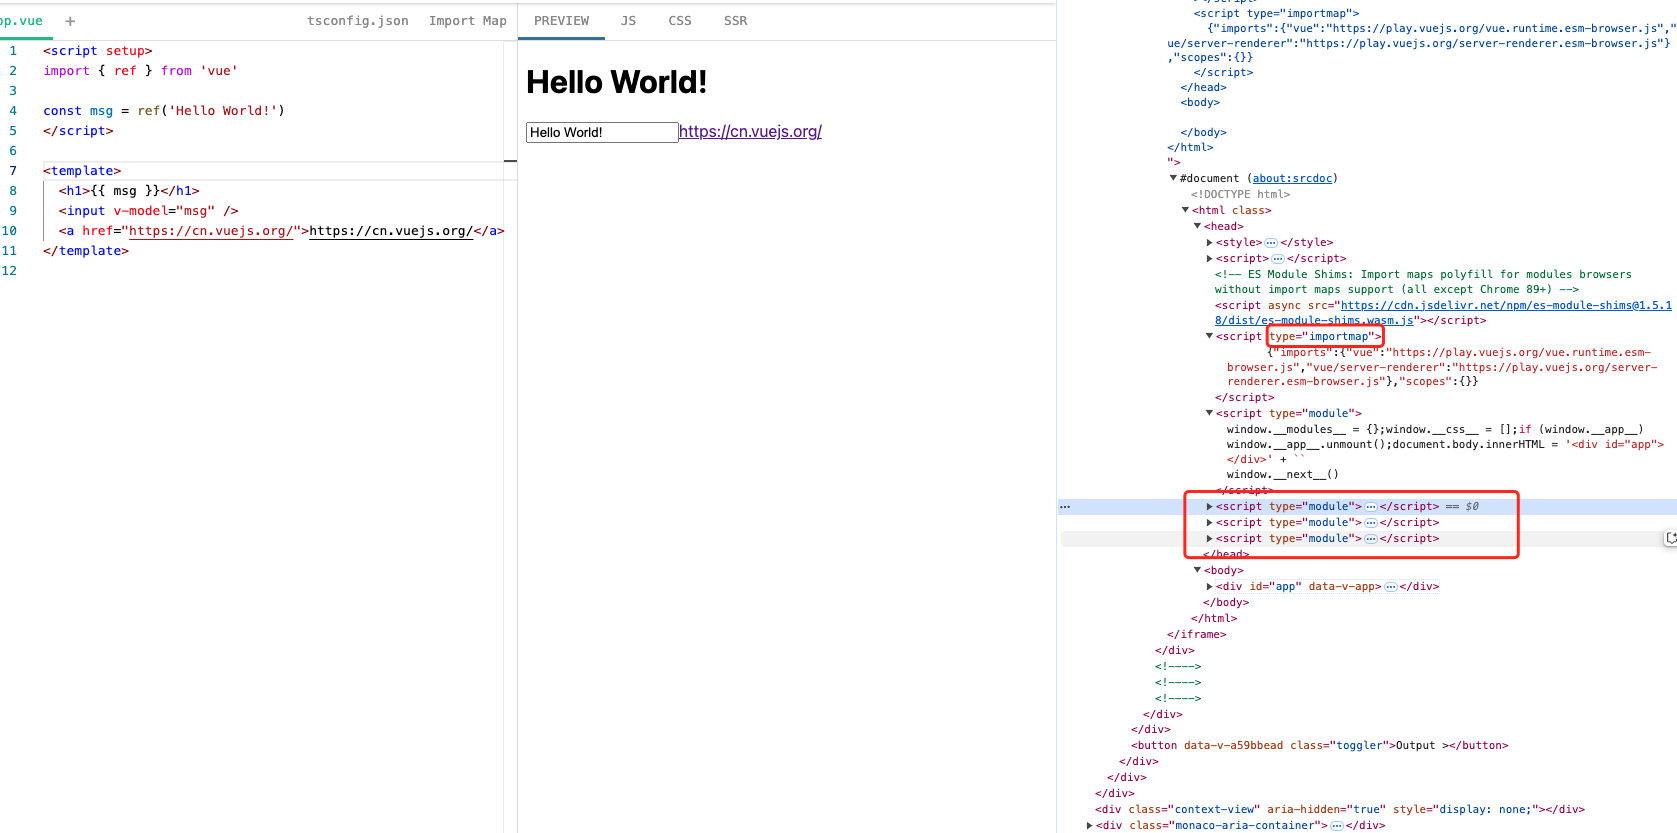
区别于Vue Playground就是代码段是通过编译器vue/compiler-sfc 以及 babel编译后的代码。
if (action === 'catch_clicks')中主要是处理a标签的点击事件的拦截处理。默认没有target属性的统一使用window.open(el.href, '_blank')做跳转
再srcdoc.html中其他的javascript逻辑都是做代理的如下几段代码块:
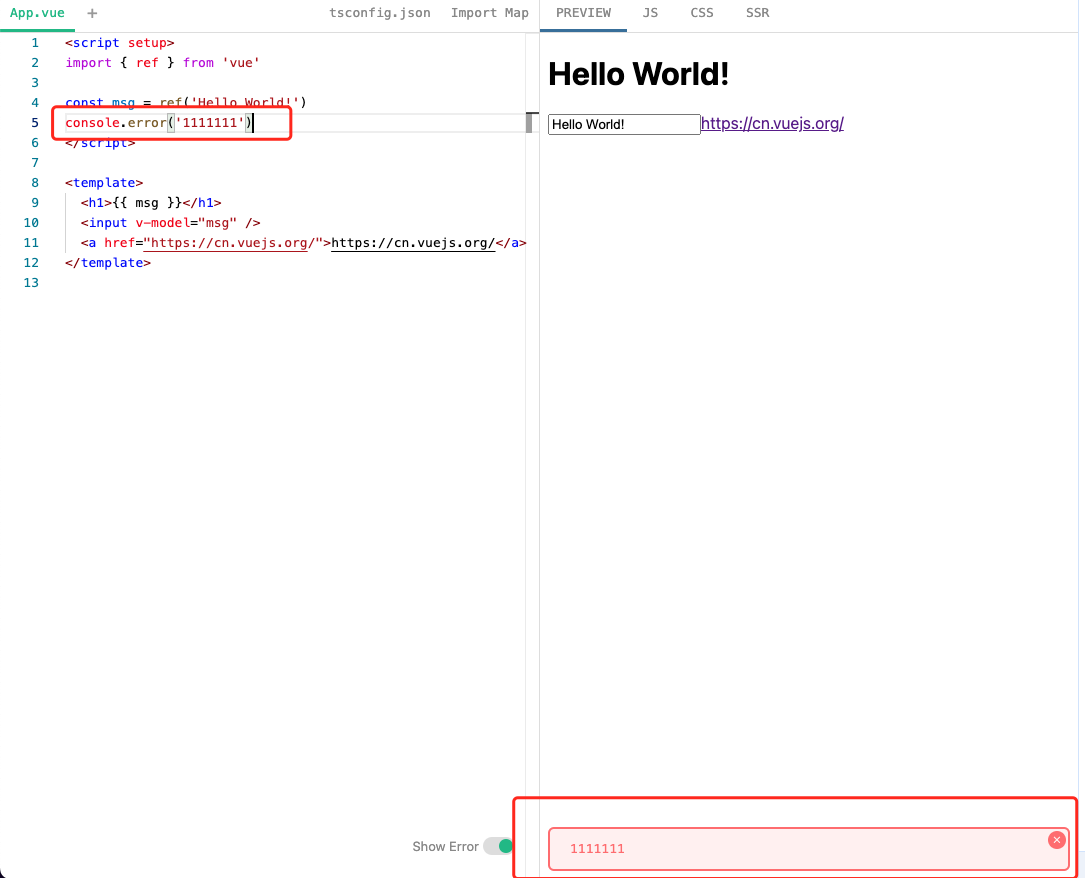
// 对 console 上的方法做代理 向上交互
["clear", "log", "info", "dir", "warn", "error", "table"].forEach((level) => {
  // ...省略部分代码
  parent.postMessage({ action: "console", level, duplicate: true }, "*");
});也是对console上的方法代理的
[
  { method: "group", action: "console_group" },
  { method: "groupEnd", action: "console_group_end" },
  { method: "groupCollapsed", action: "console_group_collapsed" },
].forEach((group_action) => {
  const original = console[group_action.method];
  console[group_action.method] = (label) => {
    parent.postMessage({ action: group_action.action, label }, "*");

    original(label);
  };
});
读到这里应该能了解整个从
Vue Playground到Vue DevTools的渲染逻辑了。
PreviewProxy.ts 是如何做代理类的
let uid = 1;

export class PreviewProxy {
  iframe: HTMLIFrameElement;
  handlers: Record<string, Function>;
  pending_cmds: Map<
    number,
    { resolve: (value: unknown) => void; reject: (reason?: any) => void }
  >;
  handle_event: (e: any) => void;

  constructor(iframe: HTMLIFrameElement, handlers: Record<string, Function>) {
    this.iframe = iframe;
    this.handlers = handlers;

    this.pending_cmds = new Map();

    this.handle_event = (e) => this.handle_repl_message(e);
    window.addEventListener("message", this.handle_event, false);
  }

  destroy() {
    window.removeEventListener("message", this.handle_event);
  }

  iframe_command(action: string, args: any) {
    return new Promise((resolve, reject) => {
      const cmd_id = uid++;

      this.pending_cmds.set(cmd_id, { resolve, reject });

      this.iframe.contentWindow!.postMessage({ action, cmd_id, args }, "*");
    });
  }

  handle_command_message(cmd_data: any) {
    let action = cmd_data.action;
    let id = cmd_data.cmd_id;
    let handler = this.pending_cmds.get(id);

    if (handler) {
      this.pending_cmds.delete(id);
      if (action === "cmd_error") {
        let { message, stack } = cmd_data;
        let e = new Error(message);
        e.stack = stack;
        handler.reject(e);
      }

      if (action === "cmd_ok") {
        handler.resolve(cmd_data.args);
      }
    } else if (action !== "cmd_error" && action !== "cmd_ok") {
      console.error("command not found", id, cmd_data, [
        ...this.pending_cmds.keys(),
      ]);
    }
  }

  handle_repl_message(event: any) {
    if (event.source !== this.iframe.contentWindow) return;

    const { action, args } = event.data;

    switch (action) {
      case "cmd_error":
      case "cmd_ok":
        return this.handle_command_message(event.data);
      case "fetch_progress":
        return this.handlers.on_fetch_progress(args.remaining);
      case "error":
        return this.handlers.on_error(event.data);
      case "unhandledrejection":
        return this.handlers.on_unhandled_rejection(event.data);
      case "console":
        return this.handlers.on_console(event.data);
      case "console_group":
        return this.handlers.on_console_group(event.data);
      case "console_group_collapsed":
        return this.handlers.on_console_group_collapsed(event.data);
      case "console_group_end":
        return this.handlers.on_console_group_end(event.data);
    }
  }

  eval(script: string | string[]) {
    return this.iframe_command("eval", { script });
  }

  handle_links() {
    return this.iframe_command("catch_clicks", {});
  }
}
eval()、handle_links() 方法调用 iframe_command 是发送消息给iframe,然后iframe接受处理创建script标签和处理a标签的点击事件。
handle_repl_message() 方法是接受iframe向上交互来的数据(多是一些log日志)也有创建script完成失败的(cmd_error、cmd_ok)。
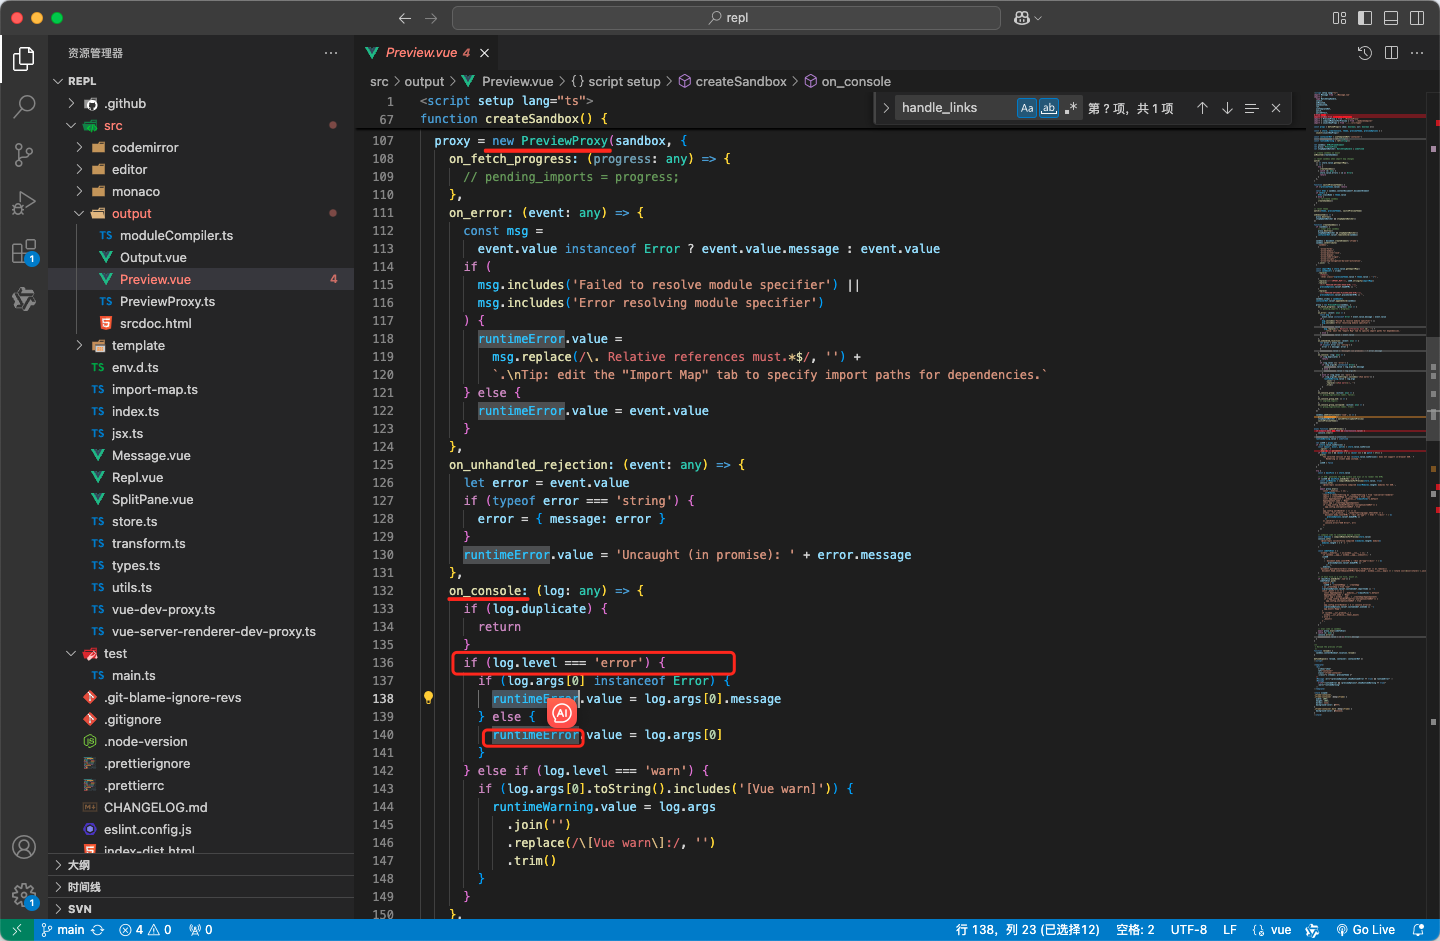
这么看
PreviewProxy的作用就一清二楚了,就是做代理的。如果后面咱们有需要iframe交互的可以借鉴这个类的实现
关于编译
其实就差moduleCompiler.ts文件没有展开分析了,它里面出来是用vue/compiler-sfc来编译咱们编辑器中写的SFC源代码的。编译这块还挺复杂牵扯到AST生成,以及使用babel咱们就不在这系列中讲了。
其实在iframe中已经引入vue的CDN了,如果在编辑器中限制只让编写js或者html文件,并且不模块化,那么就不需要编译了直接丢给iframe源代码即可。如下
<!DOCTYPE html>
<html lang="en">
  <head>
    <meta charset="UTF-8" />
    <meta name="viewport" content="width=device-width, initial-scale=1.0" />
    <title>Vue.js Button Example with Import Maps</title>
    <!-- 使用 Import Maps 引入 Vue.js -->
    <script type="importmap">
      {
        "imports": {
          "vue": "https://unpkg.com/vue@3.2.31/dist/vue.esm-browser.js"
        }
      }
    </script>
  </head>
  <body>
    <div id="app">
      <h1>{{ message }}</h1>
      <button @click="updateMessage">点击我</button>
    </div>

    <script type="module">
      import Vue from "vue";

      new Vue({
        el: "#app",
        data: {
          message: "欢迎来到 Vue.js 示例!",
        },
        methods: {
          updateMessage() {
            this.message = "按钮被点击了!";
          },
        },
      });
    </script>
  </body>
</html>当然为了让用户体验更好,Vue Playground还是做了SFC并且编译的逻辑。
总结
Vue Playground源码系列咱们共分为四篇,分别从:
- 动态获取版本,并且简单了解了下
jsdelivr。 - 动态设置高度
?raw是做什么的,以及jszip配合file-saver的下载项目.
importmap的相关用法。- 简单介绍了
hash和history模式的区别。 - 介绍了
playground分享功能利用hash模式的实现。 - 使用
hash模式下利用fflate对数据进行压缩、解压。 - 介绍了核心源码
useVueImportMap 和 useStore的实现逻辑
codemirror代码编辑器的基础用法,以及Vue Playground源码中具体实践monaco-editor代码编辑器的基础用法,以及Vue Playground源码中的具体实践。
《Vue Playground 演练场源码解读(四)- 终篇》
iframe的交互应用iframe的srcdoc和sandbox相关应用实践Vue Playground预览功能的实现- 拆分
PreviewProxy.ts是如何做代理类的
咱们从源码中学到了这么多东西,以及演武场的实现思路,还学到了许多好用的插件。大家好,我是
CSC,欢迎大家点赞收藏